Health & Safety
Part 1 - Machine shop
The thing to remember about 'Health & Safety' is that you need to be thinking about it all the time. Its not enough to just to be safe around that machine or while doing that job. You need to constantly look for possible hazards and eliminate them before they become a problem. Eliminate the hazard rather than work around it. Its important to remember, when working in a workshop with many people, that your surroundings can change quickly.
Rule: If you remove the Hazard you remove the potential for injury.
The are alot of potential hazards around the workshop. These can vary depending what machinery and materials you use. Important you locate the First Aid box, Fire Extinguishers & MSDS before starting work. MSDS (Material Safety Data Sheets) sheets tell you emergency procedures of the chemicals in your workshop.
Fire Extinguishers
It is important you know how to use a Fire Extinguisher and which one to use in an emergency. If you use the wrong one you could make the Fire worse or put yourself in danger.
There are Six different class' of fire extinguisher, designed to fight different types of fire. They range in size and application. They are as follows;
- Class A This class covers material fires such as Wood, Paper, Plastics
This can be a Dry powder agent
- Class B This class covers Flammable liquids such as Petrol, Diesel, Oils
This can be a Dry powder agent
- Class C This class covers Flammable Gases
This can be a Dry powder agent
- Class D This class covers Combustable Metals such as Magesium, Titanium, Potassium
- Class E This class covers Electrical Fires
This can be a Carbon dioxide or Dry powder agent that is non-conductive.

- Class F This class covers fires involving Cooking Oils and Fats
Operation of an extinguisher are pritty straight forward..
- Stand aproximitly 6ft from fire.
-Pull safety pin
-Point in the direction of the fire. Be sure to aim at the base of the fire.
- Pull the trigger
- Empty container
Make sure you do not put yourself in excessive danger while trying to extinguish the fire.

For more info www.newzealandfireextinguishers.co.nz
Before starting work
With Health & Safety in mind take these steps before starting work.
Before entering the workshop you need aquire some saftey gear.
Gear required for the workshop.

- Overalls, prefferably made from Cotton (Safety suppliers offer a wide range of general & special purpose overalls. Overalls are used to protect us from hazards that can not be isolated or eliminated. Such hazards are Oil, Grease, Solvents, Direct & radiant heat, sparks and swarf, blood and body fluids. Should also be flame retardent. For more info Standard AS/NZS 4501.2:2006 Occupational Protective Clothing: General Requirements)
Note: Overalls must be worn up at all times
- Ear Muffs (Although you do not need to constantly wear ear protection it is advised when working around loud machinery. Ear Muffs come in different strenghths and sizes so pick accordingly. Standard AS/NZS 1270). Note: Gloves optional.

- Saftey Glasses (Safety Glasses can have many characteristics, such as varied impact strength, tinting, shapes an sizes. Its important you pick a pair that is suited to you application, fits comfortably and completely covers your eyes. Standard AS/NZS1337)
 .
.- Safety Boots (Safety Boots, for foot protection, come in a wide range. Styles, Colours, waterprof, leather, PVC, etc to suit different applications. Whether you get low cut or high cut, lace up or slip on make sure you pick a pair that will suit your application. In order to meet regulation you must have a steel cap in you boots. Standard AS NZS 2210).
Now that you have your safety gear on you can enter the workshop.
- As you enter the workshop take a second to look around and take in what is in you enviroment. Identify any hazards that may impact you or someone around you while you are working. If possible remove these hazards or notify others of the hazard.- Locate the First Aid box, Fire Extinguisher, MSD Sheets.
- Locate your Exits in case of emergency.
- You can now locate your workbech and start work.
In an Emergency call 111
Machinery and Hand tools
Heres the run down on the Machines you can expect to use while in the workshop.

- Lathe: It is important that you are properly instructed on safety and operation of the lathe before atempting to use the machine.
- Locate the emergency stop button before starting work.
- You should be wearing all safety gear. Overalls, boots, Glasses.
- You should not be wearing any loose clothing
- Make sure if you have long hair that it is tied up to avoid catching it on the machine.
- Use all safety guards supplied with the machine.
- Do Not leave the chuck key in.
I have attached an instructional video.
http://www.youtube.com/watch?v=EJT1PlWxbho

- Drill Press: It is important that you are properly instructed on safety and operation of the Drill Press before atempting to use the machine.
- Locate the Emergency stop button before starting work.
-You should be wearing all of your safety gear. Overalls, Boots, Glasses, Earmuffs.
- Make sure any long hair is tied up.
- Make sure drill in secured to floor properly.
- Be sure chuck has stopped revolving before useing key.
- Use all safety guards supplied with the machine.
- Let the drill bit do the work. Dont cause excess pressure on the bit or it will break.
I have attached a short instructional video http://www.youtube.com/watch?v=w8UN6OZmifs

- Bench Grinder: It is important that you are properly instructed on safety and operation of the Bench Grinder before atempting to use the machine.
- Locate the Emergency stop button before starting work.
-You should be wearing all of your safety gear. Overalls, Boots, Glasses, Earmuffs.
- Make sure long hair is tied up.
- Make sure the Grinder in bolted to the bench securely.
- Make sure the grinding wheels are secures
- Make sure you use all guards supplied with the machine.
- Ensure any rests are in the appropreate place.

-Bench Vice: This is a tool you will use very often in the workshop. Used mainly to hold material while being worked on. The vice should be secured firmly to the bench before use. You may like to use a soft metal plate between the clamping face and your material to avoid damage. All safety gear should be worn when using this equipment.

- Metal File: Metal files such as this one willbe used in most aspects of fabrication. Ranging in size and shape, Fine to course grit. Check to make sure handle is secure before use.

- Hack Saw: Hack Saws are use to chop of excess metal. As they are not the most accurate cutting tool hack saw cuts are usually followed by filing. Check blade is secure and sharp before use. Pressure only on foward stoke.

- Ball Pein Hammer: Used for a number of applications. Generally for persuading metal into various shapes and sizes.
Note: All safety gear is to be worn while using hand tools.
Part 2 - Welding
Extra care is to be taken when welding. There are many more hazards, most of which are more dangerous. This is why we have extra saftey equipment.
![]() Welding mask - This is used to pretect you face and eyes from the intense light and heat created when welding.
Welding mask - This is used to pretect you face and eyes from the intense light and heat created when welding.
![]() Welding gloves - These are used to protect your arms and hands from the heat and splatter when welding. These also protect your arms and hands from the intense light.
Welding gloves - These are used to protect your arms and hands from the heat and splatter when welding. These also protect your arms and hands from the intense light.

 Welding gloves - These are used to protect your arms and hands from the heat and splatter when welding. These also protect your arms and hands from the intense light.
Keep in mind that health & Saftey is more than just the equipment you use. Its also about the way we use that equipment.

Bottles
Oxygen - Pure Oxygen, about 93%, is used to oxidise the flame. This results in major heat increases needed for weilding. Oxygen is storged upright and in a black bottle. Oxygen should be secure and kept separate from combustible materials. Oxygen has a right hand thread on the bottle.
Acetylene - Acetylene is a highly flamable gas. We mix this in different ratios with pure oxygen and ignite to produce a flame about 3500dg used for weilding and cutting metals. Acetylene is stored upright in a maroon coloured bottle. This bottle should remain upright and secure while being transported, and should be kept away from ignition sources and separate from oxidisers. Acetylene has a left hand thread.
Note - The Acetylene cylinder is filled with a porous substants that saoks the liquid acetylene and releases it as a gas as the pressure in the cylinder drops.
Pressure Gauges
Pressure Gauges
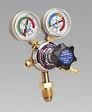 A set of pressure gauges should be located above each cylinder. Between the cylinder and the Flashback arrestor. This gauge measures bottle pressure and line pressure.
 Welding hoses


Welding Torch & Tips
Welding torch - This is a handle that the welder holds and uses to manipulate the weld. Two gas hoses screw into the end of the torch, oxy/Acetylene. They are then mixed into the torch using the two valves at the back of the handle. By changing the tip to different sizes allows the welder to increase the amount of Oxygen and Acetylene flowing out of the torch. This increases the heat of the flame allowing the welder to weld thicker metals.Cutting torch - This is the same as a welding torch apart from the tip and an extra Oxy line within the handle. The extra Oxy line enables the welder to give a burst of oxygen to the flame which will blow excess metal from the cut. The cutting torch tip has multiple holes in the end and looks like this..


Flashback Arrestor
A Flashback arrestor is fitted between the pressure gauges and the gas hose and is designed to stop any flames returning to the bottle via the gas hose should a flashback occur.
Different Flames
Different flames are used to weld, braze, cut, heat differnet materials. When welding we use neutral flame. This flame does not have an excess of oxygen, Oxidising flame, or Acetylene, Carbonising flame. As a rule you would use a small tip when welding thin metal and a large tip when welding thick metal.
this is a very effort, keep it up
ReplyDelete