Tuesday, April 12, 2011

Marine Trailers


Marine Trailers

Trailer Types
Single Axle - As they are generaly small, these are easy to manouver, light and low maintenece. These are the most common type of trailer and do not have a braking system. They have a SWL of 2000kgs.


Tandem Axle - 1 axle and 2 extra tyres make for a much smoother ride. Combine that with a braking system and you increase the SWL greatly(Will vary depending on braking system). Maintenece does increase as there is now a braking system and extra fittings.


Triple Axle - Generally only used in special circumstances, such as when transporting for repair. These trailers have huge SWL, with this comes the extra maintenece of 3 Axles and fittings to suit. Ranging in size these trailers can be towed by a 4-wheel drive or truck.


Trailer Materials
Mild Steel - Steel is generaly an Alloy of Iron and Cabon, and can have other elements added to it to give it desired attributes. Modern day Mild Steel contains low carbon, usually less than 0.8%, and practicly no slag. Mild Steel is strong and able to with stand an impact with out shattering. Steel is heavy and will need to be treated to prevent oxidization in salt water. Painted steal is good for fresh water.

Galvanized Steel - Galvanized Steel has the same characteristics as mild steel, but has been coated in a Zinc layer for protection againsed corrsion. Zinc is easier and cheaper than using other metallic coatings such an Chromium, Aluminium or Nickel. In a process called 'Hot Dipping' the Mild steel frame is dipped in Acid to remove dirt & grease, then dryed and dipped into a pool of molten Zinc. Especially good for Sea water boats.

Aluminium - Aluminium is the most abundant metallic elment in the Earths crust. It is a strong electropositive metal and is extremely reactive. When exposed to air Aluminium becomes covered in a tough, transperent layer of Aluminium oxide. this layer serves as protection from corrosion. Aluminium weighs less than a third of the same volume of steel, and has a high strength-to-weight ratio. Can be expensive but this material needs no further protection.


Trailer Design & Construction
Design
A-Frame - This is a basic design but distributes weight well across the trailer.


Pole Tongue - This design can accomodates a tilting deck and is usually for lighter boats.
Blogs

Construction
-Once you have your material you will focus on design. Below are a few forms of frame constructruction.

 
- The best form of construction in my opinion would be either Box or Pipe tubeing. This design form has a good strength and can protect wires from impact and sun exposure.
- If using I-beams or Channel-beams it is recommended that you use either Galvanized or Mild steel as Aluminium would not be strong enough.

WOF Regulation
Width - The maximum width of a trailer is 2.5m and any trailer that is wider than 1.8m must have foward facing side lamps.

Rear overhang - The load must not overhang more than 4m from the rear axle.

Foward disance - The distance from the rear axle to the tow coupling must not exceed 8.5m.

Tyres - Must be a minimum of 1.5mm tread acros 3/4 of the tyre.

Suspension & Weight Capabilities
Leaf spring suspension- Leaf springs are most commonly used. they are able to withstand varying loads depending how many leaves in the spring. There are a few variations of the leaf spring.


Coil Spring suspension - Coil springs are  able to withstand heavy loads. Combine with shock absorber to smooth load.

Torsion suspension - A torsion suspesion is as follows.

Braking & Hubs
Disk type System - A Disc type braking system would be the most common type of system in modern trailers. Disk brakes work as hydrolic fuild is pushed against a piston clamping the brake pad against the rotor. This brake system can be upgraded to provide more stopping power by increasing the number of pistons per caliper.


Drum type System - Drum type brakes are used on smaller trailers. These brakes work when the hydrolic cylinder pushes the brake shoes outward toward the inside of the brake drum, slowing the rotation as friction builds. Drum brakes can be problematic in the marine industry as water can get into the drum and mixes with the brake dust, this then turns to a paste and when dry can cause the brakes to seize.

Hydrolic Brakes - Both disk and drum brakes can be hydrolic. Hydrolic trailer brakes are controlled by the Master cylinder on the tow coupling as below.


Cable Brakes - Both disk and drum brakes can be Cable controlled. A cable is attached to the caliper in a way that when pulled tight a clamping force is exerted. this cable is controlled by a handle on the tow coulping, as left, and can be locked into position.

 
A trailers SWL is governed by the rating of the tow coupling.

Rims & Tyres
Generaly 13-14" Steel or Alloy rims. These can be replaced with mag wheels if desired.


Tyres can range in width, profile, weight bearing capacity & purpose. Choose a wider tyre for a more stable load. Tyres have different speed ratings also.


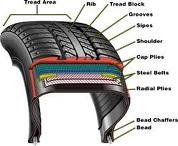
Its important that when choosing a tyre that the tyre fitted is built for trailer use. As trailer tyres have stronger side wall to withstand larger weight loads and prevent blow outs.

Lighting & Fittings
Tail lightsUsealed bulb lights - Unsealed bulb lights are common on older trailers. When a trailer enters the water the lights may become submerged, as this unit is not a sealed unit it will corrode easily and will need to be replaced.


Sealed L.E.D lights - (Light Emitting Diode) Sealed L.E.D lights would be the best for most applications. As the unit is sealed the possiblity of corrosion is very low unless the casing has been damaged in some way. L.E.D lights are very energy efficent. The downside to them is that if a couple of the tiny bulbs blow then the whole unit needs to be replaced.


- You may like to fix you light board high on your trailer similar to this picture, to reduce corrosion.
 
 Rollers
Keel roller - This roller is designed to protect the keel of your boat during transportation. The keel roller is prefered as it is designed to roll as the boat is loaded, reducing friction.

Keel block - As with the keel roller this is designed to protect the keel of your boat during transportation. Made from rubber this design is often disliked due to the friction it causes when loading the boat.

Ribbed roller - You will usually find many ribbed rollers on a trailer. They are used to help guide the boat onto the trailer when loading, and to spread the load of the boat evenly across is hull. See single axle trailer pic.


Stop block - This is a rubber stop that is located at the front of the trailer and allows the winch to pull the boat up tight againsted the front of the trailer. 

Winch - The winch should be able to pull a load equal to at least half of the gross weight of the boat, motor and cargo. Be sure to check for corrosion and damage before use to reduce risk of damaging boat. Electric winches are also available.
References

http://www.xpresstrailers.com/
http://www.google.com/
http://www.boatdesign.com/
http://www.nzta.govt.nz/
Encarter 2004

Wednesday, April 6, 2011

Health & Safety

Health & Safety
Part 1 - Machine shop

The thing to remember about 'Health & Safety' is that you need to be thinking about it all the time. Its not enough to just to be safe around that machine or while doing that job.  You need to constantly look for possible hazards and eliminate them before they become a problem. Eliminate the hazard rather than work around it. Its important to remember, when working in a workshop with many people, that your surroundings can change quickly.

Rule: If you remove the Hazard you remove the potential for injury.

The are alot of potential hazards around the workshop. These can vary depending what machinery and materials you use. Important you locate the First Aid box, Fire Extinguishers & MSDS before starting work. MSDS (Material Safety Data Sheets) sheets tell you emergency procedures of the chemicals in your workshop.

Fire Extinguishers

It is important you know how to use a Fire Extinguisher and which one to use in an emergency. If you use the wrong one you could make the Fire worse or put yourself in danger.

There are Six different class' of fire extinguisher, designed to fight different types of fire. They range in size and application. They are as follows;
 - Class A This class covers material fires such as Wood, Paper, Plastics
                        This can be a Dry powder agent
 - Class B This class covers Flammable liquids such as Petrol, Diesel, Oils
                        This can be a Dry powder agent
 - Class C This class covers Flammable Gases
                        This can be a Dry powder agent
 - Class D This class covers Combustable Metals such as Magesium, Titanium, Potassium
 - Class E This class covers Electrical Fires
                        This can be a Carbon dioxide or Dry powder agent that is non-conductive.
 - Class F This class covers fires involving Cooking Oils and Fats

Operation of an extinguisher are pritty straight forward..


- Stand aproximitly 6ft from fire.
-Pull safety pin
-Point in the direction of the fire. Be sure to aim at the base of the fire.
- Pull the trigger
- Empty container


Make sure you do not put yourself in excessive danger while trying to extinguish the fire.


Before starting work
With Health & Safety in mind take these steps before starting work.

 Before entering the workshop you need aquire some saftey gear.
Gear required for the workshop.
      

- Overalls, prefferably made from Cotton (Safety suppliers offer a wide range of general & special purpose overalls. Overalls are used to protect us from hazards that can not be isolated or eliminated. Such hazards are Oil, Grease, Solvents, Direct & radiant heat, sparks and swarf, blood and body fluids. Should also be flame retardent. For more info Standard AS/NZS 4501.2:2006 Occupational Protective Clothing: General Requirements)

Note: Overalls must be worn up at all times


- Ear Muffs (Although you do not need to constantly wear ear protection it is advised when working around loud machinery. Ear Muffs come in different strenghths and sizes so pick accordingly. Standard AS/NZS 1270). Note: Gloves optional.
- Saftey Glasses (Safety Glasses can have many characteristics, such as varied impact strength, tinting, shapes an sizes. Its important you pick a pair that is suited to you application, fits comfortably and completely covers your eyes. Standard AS/NZS1337).
            

- Safety Boots (Safety Boots, for foot protection, come in a wide range. Styles, Colours, waterprof, leather, PVC, etc to suit different applications. Whether you get low cut or high cut, lace up or slip on make sure you pick a pair that will suit your application. In order to meet regulation you must have a steel cap in you boots. Standard AS NZS 2210).


Now that you have your safety gear on you can enter the workshop.

          - As you enter the workshop take a second to look around and take in what is in you enviroment. Identify any hazards that may impact you or someone around you while you are working. If possible remove these hazards or notify others of the hazard.
          - Locate the First Aid box, Fire Extinguisher, MSD Sheets.
          - Locate your Exits in case of emergency.
          - You can now locate your workbech and start work.
 In an Emergency call 111

 Machinery and Hand tools
Heres the run down on the Machines you can expect to use while in the workshop.

- Lathe: It is important that you are properly instructed on safety and operation of the lathe before atempting to use the machine.

                       - Locate the emergency stop button before starting work.
                       - You should be wearing all safety gear. Overalls, boots, Glasses.
                       - You should not be wearing any loose clothing
                       - Make sure if you have long hair that it is tied up to avoid                               catching it on the machine.
                       - Use all safety guards supplied with the machine.
                       - Do Not leave the chuck key in.

 I have attached an instructional video.
 http://www.youtube.com/watch?v=EJT1PlWxbho


- Drill Press: It is important that you are properly instructed on safety and operation of the Drill Press before atempting to use the machine.

                  - Locate the Emergency stop button before starting work.
                  -You should be wearing all of your safety gear. Overalls,                            Boots, Glasses, Earmuffs.
                  - Make sure any long hair is tied up.
                  - Make sure drill in secured to floor properly.
                  - Be sure chuck has stopped revolving before useing key.
                  - Use all safety guards supplied with the machine.
                  - Let the drill bit do the work. Dont cause excess pressure on the bit or                     it will break.

I have attached a short instructional video http://www.youtube.com/watch?v=w8UN6OZmifs

- Bench Grinder: It is important that you are properly instructed on safety and operation of the Bench Grinder before atempting to use the machine.
             
                    - Locate the Emergency stop button before starting work.
                    -You should be wearing all of your safety gear. Overalls,                            Boots, Glasses, Earmuffs.
                    - Make sure long hair is tied up.
                    - Make sure the Grinder in bolted to the bench securely.
                    - Make sure the grinding wheels are secures
                    - Make sure you use all guards supplied with the machine.
                    - Ensure any rests are in the appropreate place.

I have attached a short video http://www.youtube.com/watch?v=VobCyF2_v5Q


-Bench Vice: This is a tool you will use very often in the workshop. Used mainly to hold material while being worked on. The vice should be secured firmly to the bench before use. You may like to use a soft metal plate between the clamping face and your material to avoid damage. All safety gear should be worn when using this equipment.


- Metal File: Metal files such as this one willbe used in most aspects of fabrication. Ranging in size and shape, Fine to course grit. Check to make sure handle is secure before use.

- Hack Saw: Hack Saws are use to chop of excess metal. As they are not the most accurate cutting tool hack saw cuts are usually followed by filing. Check blade is secure and sharp before use. Pressure only on foward stoke.


- Ball Pein Hammer: Used for a number of applications. Generally for persuading metal into various shapes and sizes.

Note: All safety gear is to be worn while using hand tools.

Part 2 - Welding
Extra care is to be taken when welding. There are many more hazards, most of which are more dangerous. This is why we have extra saftey equipment.

Welding mask - This is used to pretect you face and eyes from the intense light and heat created when welding.

Welding gloves - These are used to protect your arms and hands from the heat and splatter when welding. These also protect your arms and hands from the intense light.


 Keep in mind that health & Saftey is more than just the equipment you use. Its also about the way we use that equipment.

Bottles
Oxygen - Pure Oxygen, about 93%, is used to oxidise the flame. This results in major heat increases needed for weilding. Oxygen is storged upright and in a black bottle. Oxygen should be secure and kept separate from combustible materials. Oxygen has a right hand thread on the bottle.

Acetylene - Acetylene is a highly flamable gas. We mix this in different ratios with pure oxygen and ignite to produce a flame about 3500dg used for weilding and cutting metals. Acetylene is stored upright in a maroon coloured bottle. This bottle should remain upright and secure while being transported, and should be kept away from ignition sources and separate from oxidisers. Acetylene has a left hand thread.
Note - The Acetylene cylinder is filled with a porous substants that saoks the liquid acetylene and releases it as a gas as the pressure in the cylinder drops.

Pressure Gauges
A set of pressure gauges should be located above each cylinder. Between the cylinder and the Flashback arrestor. This gauge measures bottle pressure and line pressure. 

Welding hoses
Welding hoses are specificly designed. The are also colour coded, red/maroon is acetylene and Black is Oxygen. These are crimped to hose fittings at each end. These fittings have handed threads to stop misconnection.


Welding Torch & Tips
Welding torch - This is a handle that the welder holds and uses to manipulate the weld. Two gas hoses screw into the end of the torch, oxy/Acetylene. They are then mixed into the torch using the two valves at the back of the handle. By changing the tip to different sizes allows the welder to increase the amount of Oxygen and Acetylene flowing out of the torch. This increases the heat of the flame allowing the welder to weld thicker metals.
Cutting torch - This is the same as a welding torch apart from the tip and an extra Oxy line within the handle. The extra Oxy line enables the welder to give a burst of oxygen to the flame which will blow excess metal from the cut. The cutting torch tip has multiple holes in the end and looks like this..


Flashback Arrestor
A Flashback arrestor is fitted between the pressure gauges and the gas hose and is designed to stop any flames returning to the bottle via the gas hose should a flashback occur.

Different Flames
Different flames are used to weld, braze, cut, heat differnet materials. When welding we use neutral flame. This flame does not have an excess of oxygen, Oxidising flame, or Acetylene, Carbonising flame. As a rule you would use a small tip when welding thin metal and a large tip when welding thick metal.

References
http://www.wikipedia.com/
http://www.google.com/
Ed May Vol 1
Ed May Vol 2